Introduction
When saving your work in Kingspray for Quest, the paint data is saved to your device as 2 data files: Paint.ape and Paint_Mask.ape . These files contain just enough information to re-create your work in Kingspray. In order to use this data in other applications, you’ll need to convert the data files in to something that other programs can read. This converter will allow you to convert your saved work into multiple png files which can then be used in other programs.
Choosing your data files
The .ape files are saved to your device any time that you use the in game phone to take a picture. To locate the .ape files, turn on your quest and connect it to your computer via a usb cable. Put the quest on your head and you should see a notification asking if you want to allow your computer to access files on the Quest. Select “Allow” and then take the headset off again.
You should now be able to browse the files on your quest using your computer’s build in file manager. To locate the .ape files, navigate to:
\Quest\Internal shared storage\Android\data\com.infectiousape.kingspray\files
In that location you should see folders for each of the Kingspray locations that you have saved work in. Enter one of those folders and you will see more folders made up of time stamps (the time stamps represent the date and time of when the data was saved). Enter one of those folers and you will see the two .ape files for that save: Paint.ape and Paint_Mask.ape .
Copy those files to your local computer in a location that you can easily navigate to. Now start up the converter.
Using the converter
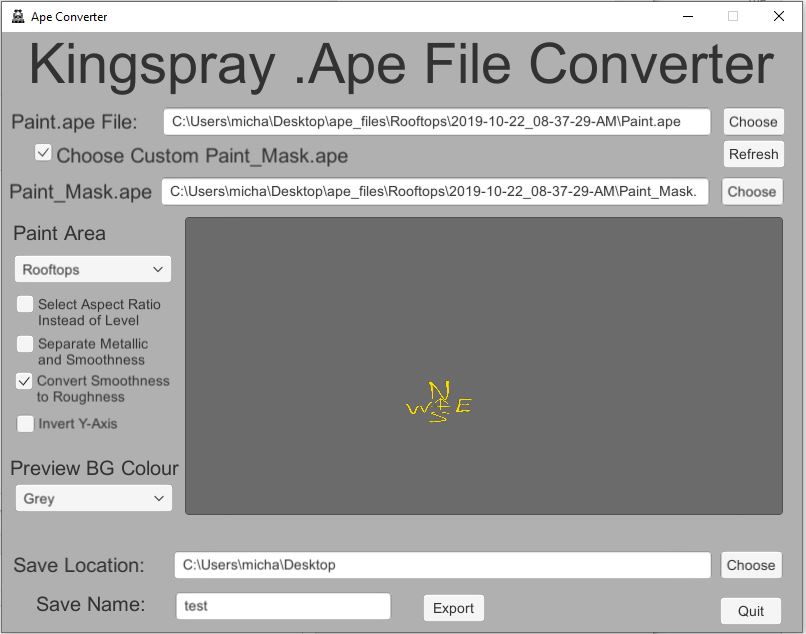
Right at the top of the converter you must choose the Paint.ape file that you want to convert. Click on the “Choose” button if you would like to use a file chooser to find the Paint.ape file or you can type it in yourself. If you do type it in, instead of using the file chooser, you will need to click the “Refresh” button to load the Paint.ape file into the converter for preview.
By default, the converter will try to use the Paint_Mask.ape file in that same location. If for some reason you want to use a different Paint_Mask.ape file (say, perhaps, you renamed it to something other than Paint_Mask.ape) then you’ll need to check the “Choose Custom Paint_Mask.ape” checkbox and again choose or type in the path to your Paint_Mask.ape file in the field that appears.
Once you have chosen a valid Paint.ape, and pressed the refresh button, you should see a preview of your paint in the middle of the window with some options off to the left. If you see the options at the left but no paint in the preview, try selecting a different “Preview BG Colour”.
It is likely that your preview will not look correct upon first loading it into the converter. The .ape files don’t store any information about the proportions (aspect ratio) of the the original image so you need to tell it what those are. The simplest way is to select a location from the “Paint Area” menu. So, for example, if you’re converting a .ape file that was saved in the TopDog Garage location, select “TopDogGarage” from the menu. If, for some reason, you’d like to explicitly choose an aspect ratio, you can check the “Select Aspect Ratio Instead of Level” checkbox and choose an aspect ratio from the menu.
Extra Options
There are three more options below the “Paint Area” menu. 1. Separate Metallic and Smoothness will automatically split the Paint_Mask.ape in to individual Metallic and Smoothness textures (if you’re not sure if you need that then you probably don’t). 2. Convert Smoothness to Roughness will invert the values in the “Smoothness” texture to create a “Roughness” texture (again, you’ll know if you need that or not). 3. Invert Y-Axis flips the image vertically. OpenGL and DirectX handle the Y value in textures differently… if your preview looks upside down, check that checkbox to flip it.
Exporting
Finally, you’ll need to select a location to save the exported files to. The converter will produce 2 or 4 files (depending on if the “Sepearate Metallic and Smoothness” option is checked) so you need to choose the folder and file name separately. You can use the “Choose” button next to the “Save Location” field to choose a folder, or type it in yourself. Then you need to type a name into the “Save Name” field. This name will be used to prefix the file names on the exported files. For instance, if you enter “monkey” as the Save Name, the output files will be “monkey_Paint.png” and “monkey_Mask.png” .
Once all that is done, click on the “Export” button and a few seconds later your exported .png files should be ready.